
Table of Contents
ToggleA bedroom should be a sanctuary, a place to relax and recharge. But dust, allergens, and clutter can turn that haven into a health hazard. A surface wipe-down once a week isn’t enough: bedrooms need periodic deep cleaning to remove the accumulated grime that settles on every surface. Whether you’re prepping for spring, dealing with seasonal allergies, or simply ready to reclaim your space, a thorough bedroom deep clean targets everything from ceiling corners to under the bed. The good news? You don’t need a professional or fancy equipment. With a plan, the right supplies, and a few hours of focused effort, you can transform your bedroom into a genuinely clean, fresh-smelling retreat.
Key Takeaways
- Deep cleaning your bedroom eliminates accumulated dust, allergens, and grime that weekly surface cleaning cannot remove, creating a healthier sleep environment.
- Prepare thoroughly by gathering all supplies upfront, setting aside 3–4 hours, and ensuring proper ventilation to stay motivated and work efficiently.
- Declutter and move furniture before you start scrubbing, as this phase transforms your space most dramatically and accelerates the actual cleaning work.
- Work top-to-bottom from ceiling to floor, vacuum carpets with slow overlapping passes, and deep clean often-overlooked areas like mattress seams and window blinds where dust mites and allergens thrive.
- Wash all bedding in hot water, vacuum the mattress after applying baking soda, and establish a quarterly deep cleaning schedule to maintain long-term freshness and prevent grime buildup.
- Maintain your bedroom’s cleanliness between deep cleans by vacuuming weekly, changing bedding every 1–2 weeks, and using a cleaning checklist to stay organized.
Gather Your Deep Cleaning Supplies and Prepare the Space
Before you start, assemble everything you’ll need. Running back and forth to find a microfiber cloth kills momentum.
Essential cleaning supplies:
• All-purpose cleaner (or a mix of water and mild dish soap)
• Glass cleaner
• Disinfectant spray
• Microfiber cloths and cleaning rags
• A vacuum with upholstery and crevice attachments
• Mop and bucket (or a damp-mop system)
• Baking soda for odor removal
• White vinegar for natural degreasing
• Duster with an extendable handle
• Trash bags for decluttering
Safety gear:
• Latex or nitrile gloves (to protect hands from chemicals and dust)
• A mask or respirator if you have allergies or sensitivity to dust
• Eye protection if using spray cleaners near your face
Set aside 3–4 hours for a thorough job, depending on room size. Open windows to let fresh air circulate, which helps odors escape and keeps you from getting overwhelmed by cleaning fumes. If you’re using commercial cleaners, ensure good ventilation, cracking a window and running a ceiling fan makes a real difference, especially in smaller bedrooms.
Turning on music or a podcast helps the time pass faster. Some people find it motivating: it keeps the energy up when the work feels tedious.
Declutter and Remove Furniture First
You can’t clean under a nightstand if it’s still in the way. Start by removing or relocating everything that doesn’t belong.
The decluttering step:
- Strip the bed completely, sheets, pillows, mattress pad, and all. Set them aside for washing.
- Clear the nightstands, dressers, and shelves. Only return items that truly belong in the bedroom.
- Remove clothes from the floor, closet shelves, or hangers that are damaged.
- Take out books, magazines, cords, and other clutter.
- Move lightweight furniture (nightstands, desk chairs, or accent pieces) to the center of the room or into another space temporarily.
Honestly assess what’s actually serving you. If you haven’t worn something in a year, don’t buy storage for it, donate or discard it. This decluttering phase often takes longer than people expect, but it’s where most of the transformation happens. A clear bedroom feels cleaner almost immediately, and it makes the actual scrubbing phase much faster.
For items you’re unsure about, set a timer. Spending 20 minutes per drawer keeps you from overthinking every sock. Heavy furniture like bed frames can stay in place if they’re not blocking wall access, just work around them.
Deep Clean Your Bedroom Ceiling, Walls, and Baseboards
Work from top to bottom so dust falls downward and you’re not cleaning what you’ve already finished.
Ceiling and light fixtures:
- Use a duster with an extendable handle to knock down dust, cobwebs, and dust bunnies from corners and edges.
- For light fixtures, turn off the power, remove the cover or shade if possible, and wipe with a damp cloth.
- Pay attention to ceiling fans, dust accumulates heavily on blades and distributes every time the fan runs.
Walls:
- Start at one corner and work your way around the room.
- Use a magic eraser (melamine foam) for scuffs, marks, and fingerprints on painted walls. Dampen it slightly and test in a hidden spot first, some finishes can be damaged.
- For stubborn marks, a mixture of baking soda and water creates a gentle abrasive paste.
- Spot-clean any stains with appropriate cleaner (all-purpose for general grime, glass cleaner for light streaks).
- Don’t forget light switches, door handles, and door frames, these high-touch areas collect grime.
Baseboards:
- A vacuum with a brush attachment removes loose dust quickly.
- Follow with a damp microfiber cloth and all-purpose cleaner or diluted vinegar.
- For stubborn buildup, let the cleaner sit for a minute before wiping.
Don’t try to deep-clean walls and ceilings in one go if your bedroom is large. Break it into sections, one wall per 15 minutes keeps the work manageable. A step stool helps you reach high spots safely without straining your neck.
Tackle Flooring: From Carpets to Hardwood
Flooring takes the most abuse and holds the most dirt. Approach this based on your floor type.
Carpet care:
- Vacuum thoroughly with slow, overlapping passes. Rush vacuuming misses dirt trapped in fibers.
- Sprinkle baking soda on the carpet, let it sit for 15 minutes to neutralize odors, then vacuum again.
- For stains, use a carpet stain remover according to label directions. Test on a hidden area first.
- If you have pet odors or heavy use, rent a carpet cleaner or hire a professional. DIY spot-cleaning only goes so far.
Hardwood and laminate:
- Vacuum or sweep to remove all loose debris, grit scratches floors when you mop.
- Mix a hardwood floor cleaner with water (or use equal parts water and white vinegar for a budget option).
- Damp-mop, never wet-mop. Excess moisture damages wood and laminate.
- For scuffs, use a wood repair marker or polish designed for your floor type.
- Dry with a microfiber cloth as you go to prevent watermarks.
Tile and vinyl:
- Sweep first.
- Mix warm water with a general floor cleaner or a few drops of dish soap.
- Mop thoroughly and rinse with clean water to avoid residue.
- For grout (tile), use a grout brush and a diluted bleach solution if needed, but test on inconspicuous grout first.
A deep cleaning is the ideal time to also clean under the bed, use a vacuum with a long crevice attachment to reach dust, lost items, and forgotten debris. A deep clean of flooring often reveals how much dirt settles in corners and along baseboards.
Refresh Windows, Blinds, and Bedding for a Fresh Feel
Windows and soft furnishings are often overlooked but collect dust and allergens.
Windows and frames:
- Wipe down window frames and sills with a damp cloth and all-purpose cleaner.
- For glass, use glass cleaner and a microfiber cloth or squeegee for streak-free results.
- Don’t forget the inside edges and corners, dead skin cells and dust accumulate there.
- If you have window screens, vacuum both sides or rinse gently under the shower.
Blinds and curtains:
- For dust-prone venetian or roller blinds, close them in one direction and use a duster or microfiber cloth to trap dust between your fingers as you slide along each slat.
- Flip the blinds and repeat on the other side.
- For stubborn buildup, mix warm water with a little vinegar and dampen your cloth.
- Curtains should be vacuumed or taken down and washed according to care labels. Dust in curtains circulates every time you move them.
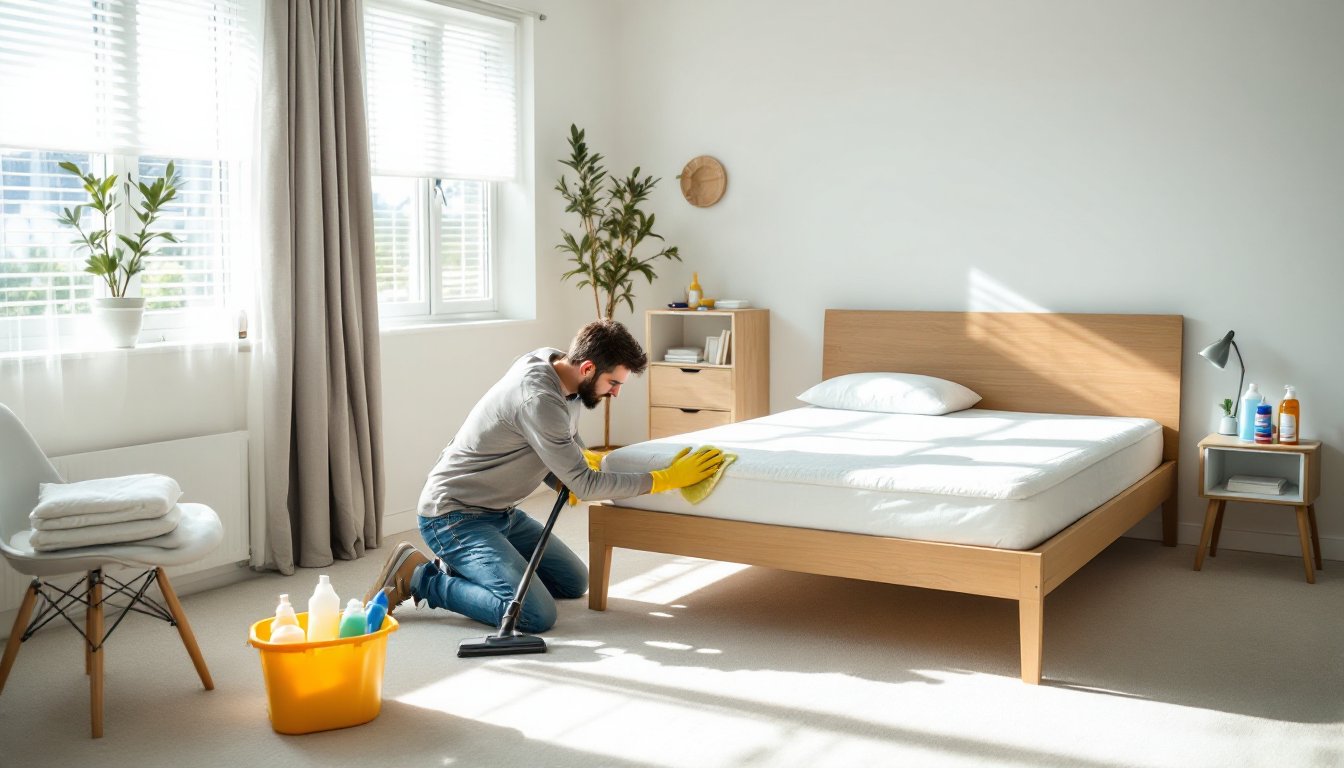
Mattress and bedding:
- Vacuum the mattress thoroughly, paying special attention to seams and edges where dust mites congregate.
- Sprinkle baking soda on the surface, let it sit for 20 minutes, then vacuum again to eliminate odors.
- Flip or rotate the mattress while you’re at it, this extends its life.
- Wash all bedding (sheets, pillowcases, duvet cover) in hot water to kill dust mites. Dry on high heat if the fabric allows.
- Pillows can usually be washed too: check the tag. If not washable, airing them outside on a sunny day helps.
A mattress cleaning service can rejuvenate an older mattress if vacuuming and baking soda don’t cut it, especially if you have allergies.
Final Touches: Furniture and Maintenance Tips for Long-Term Cleanliness
Once the heavy lifting is done, a few final steps lock in the freshness and help you maintain the results.
Furniture restoration:
- Dust and polish wood furniture with an appropriate wood cleaner or linseed oil.
- Wipe down nightstands, dressers, and shelves with a damp microfiber cloth.
- If your bed frame is wooden, wipe it down before remaking the bed.
- Clean and disinfect light switches, door handles, and any metal fixtures.
Remake the bed:
- Put on a fresh mattress pad.
- Layer clean sheets, then pillowcases and duvet cover.
- Fluff pillows and arrange blankets neatly.
Maintenance to extend the clean:
• Vacuum the floor once weekly to prevent dust accumulation.
• Wipe down nightstands and dressers during your normal cleaning routine.
• Change and wash bedding every 1–2 weeks: dust mites thrive in old bedding.
• Keep a small trash bin in the bedroom to avoid clutter piling up.
• Use a house cleaning schedule or checklist so you’re tackling different areas on a rotating basis instead of letting everything go six months between deep cleans.
• Use a humidifier or dehumidifier depending on your climate, proper humidity discourages mold and dust mites.
Consider deep cleaning your bedroom quarterly or as-needed. If you share your space or have pets, you might need to increase frequency. Allergies and respiratory sensitivities also warrant more frequent attention. The investment of one long cleaning day buys you several weeks of genuinely fresh, healthy sleeping space.
Conclusion
Deep cleaning a bedroom isn’t complicated, but it does require a system and a few hours of focused work. By decluttering first, working from ceiling to floor, and giving special attention to dust-trapping surfaces like bedding and blinds, you’ll notice an immediate difference in how your room looks, smells, and feels. The bonus? You’re not just improving aesthetics, you’re reducing allergens and creating a healthier sleep environment. Stick to a seasonal or quarterly schedule, and you’ll spend less time fighting accumulated grime. Your bedroom should be a retreat, not a project. With this guide and some elbow grease, you can make that happen.